分类
商品


![[ JS系列5 ] 可选的分号](https://pic.songma.com/wenzhang/20180606/cvzrdb3n0vf4157.jpg "[ JS系列5 ] 可选的分号")


- 商品
- 店铺
- 资讯
CAS的全称是Compare-And-Swap,它是CPU并发原语,原语的执行必需是连续的,在执行过程中不允许被中断,也就是说CAS是一条CPU的原子指令,不会造成所谓的数据不一致性问题,是线程安全的。CAS并发原语表现在Java语言中就是sun.misc.Unsafe类的各个方法,调用UnSafe类中的CAS方法。从其命名可以发现,其本质就是比较和替换。
private static int num = 0;public static boolean add(int source, int target) { int count = 0; while (true) { if (num == source) { num = target; return true; } else { count++; if (count == 10) { return false; } } }}public static void main(String[] args) { //线程栅栏,等待所有线程准备完毕后执行 CyclicBarrier cyclicBarrier = new CyclicBarrier(10); for (int i = 0; i < 10; i++) { new Thread(() -> { try { //内部使用ReentrantLock重入锁 cyclicBarrier.await(); } catch (Exception e) { e.printStackTrace(); } boolean flag = add(0, 1); if (flag) { System.out.println(Thread.currentThread().getName() + "升级成功=================="); } else { System.out.println(Thread.currentThread().getName() + "升级失败"); } }).start(); }}结果:只有一条升级成功
Thread-0升级失败Thread-7升级失败Thread-6升级失败Thread-5升级失败Thread-4升级失败Thread-3升级失败Thread-8升级成功==================Thread-2升级失败Thread-1升级失败Thread-9升级失败sun.misc.Unsafe是CAS的底层核心类,Unsafe类中所有方法都是native修饰的,也就是说Unsafe类中的方法都直接调用操作系统底层资源执行相应任务。
以ava.util.concurrent.atomic.AtomicInteger的getAndIncrement方法源码分析
/** * 当前值自增1 **/public final int getAndIncrement() { //valueOffset系统偏移量 return unsafe.getAndAddInt(this, valueOffset, 1);}/** * 获取当前值var5,并加var4 **/public final int getAndAddInt(Object var1, long var2, int var4) { int var5; do { //获取主内存当前值var5 var5 = this.getIntVolatile(var1, var2); //cas循环等待替换,var5+var4是替换后的值 } while(!this.compareAndSwapInt(var1, var2, var5, var5 + var4)); return var5;}1)循环时间长CPU开销大
2)只能保证一个共享变量的原子操作
3)会引发ABA问题
简单通过代码实现下ABA问题,线程Thread-0先将num修改为了1,而后又将num修改成了0;线程Thread-1则认为当前num一直没有经过改变,而将其修改成了10。这里我们可以发现问题,这时候num尽管值依然是0,但是其实已经不是最开始那个0了,这样在某些情况下就会导致问题。
private static int num = 0;public static boolean add(int source, int target) { int count = 0; while (true) { if (num == source) { num = target; return true; } else { count++; if (count == 10) { return false; } } }}public static void main(String[] args) { new Thread(() -> { //将数据升级为1 if (add(0, 1)) { System.out.println(Thread.currentThread().getName() + "升级num为1成功"); } else { System.out.println(Thread.currentThread().getName() + "升级num为1失败"); } //将数据升级为0 if (add(1, 0)) { System.out.println(Thread.currentThread().getName() + "升级num为0成功"); } else { System.out.println(Thread.currentThread().getName() + "升级num为0失败"); } }).start(); new Thread(() -> { //将数据升级为10 if (add(0, 10)) { System.out.println(Thread.currentThread().getName() + "升级num为10成功"); } else { System.out.println(Thread.currentThread().getName() + "升级num为10失败"); } }).start();}结果:
Thread-0升级num为1成功Thread-0升级num为0成功Thread-1升级num为10成功上面我自行实现的自旋锁过程,下面看一个atomic原子类的实现。非常简单
public static void main(String[] args) { AtomicInteger atomicInteger = new AtomicInteger(0); new Thread(()->{ atomicInteger.compareAndSet(0,1); atomicInteger.compareAndSet(1,0); }).start(); new Thread(()->{ boolean b = atomicInteger.compareAndSet(0, 10); if (b){ System.out.println("升级为10成功"); }else{ System.out.println("升级为10失败"); } }).start();}结果:
升级为10成功ABA问题的处理:其实问题的本质起因在于我们的乐观锁只比较了值能否相等,可以通过添加其余属性的比较,例如时间戳、版本号等。这里我们采用AtomicStampedReference类处理该问题。
/** * 构造方法 * @param initialRef 初始值 * @param initialStamp 初始版本戳 */public AtomicStampedReference(V initialRef, int initialStamp) { pair = Pair.of(initialRef, initialStamp);}/** * CAS方法 * @param expectedReference 初始值 * @param newReference 替换值 * @param expectedStamp 初始版本戳 * @param newStamp 新版本戳 * @return */public boolean compareAndSet(V expectedReference, V newReference, int expectedStamp, int newStamp) { AtomicStampedReference.Pair<V> current = pair; return expectedReference == current.reference && expectedStamp == current.stamp && ((newReference == current.reference && newStamp == current.stamp) || casPair(current, AtomicStampedReference.Pair.of(newReference, newStamp)));}实例:
public static void main(String[] args) { AtomicStampedReference atomicStampedReference = new AtomicStampedReference(0, 0); new Thread(() -> { atomicStampedReference.compareAndSet(0, 1, 0, 1); atomicStampedReference.compareAndSet(1, 0, 1, 2); }).start(); new Thread(() -> { boolean b = atomicStampedReference.compareAndSet(0, 1, 0, 1); if (b) { System.out.println("升级为10成功"); } else { System.out.println("升级为10失败"); } }).start();}结果:
升级为10失败在上一篇基础概念中,我们使用ReentrantLock实现了线程同步问题,代码如下:
/** * 库存 */static class Inventory { //初始化ReentrantLock实例 Lock lock = new ReentrantLock(); //库存数量 private int num = 100; //添加库存 public void add(int n) { //加锁 lock.lock(); try { num += n; System.out.println("添加库存后的数量=" + num); } finally { //释放锁 lock.unlock(); } } //减少库存 public void sub(int n) { //加锁 lock.lock(); try { num -= n; System.out.println("减少库存后的数量=" + num); } finally { //释放锁 lock.unlock(); } }}public static void main(String[] args) { Inventory inventory = new Inventory(); for (int i = 0; i < 100; i++) { new Thread(() -> { inventory.add(1); }).start(); } for (int i = 0; i < 100; i++) { new Thread(() -> { inventory.sub(1); }).start(); }}我们借ReentrantLock看下java内锁的底层结构,后续我们进行一一节点的分析
 ReentrantLock底层结构
ReentrantLock位于java.util.concurrent.locks包下,其实中包含三个内部类。
Syn:继承AbstractQueuedSynchronizer(AQS),用于实现同步机制。
FairSync:公平锁对象,继承Syn。
NonfairSync:非公平锁对象,继承Syn。
 ReentrantLock
用来构建锁或者其余同步组件的框架,是JDK中实现并发编程的核心,它提供了一个基于FIFO队列,平常我们工作中经常用到的ReentrantLock,CountDownLatch等都是基于它来实现的。
分析其源码,有两个内部类
 AbstractQueuedSynchronizer内部类
逐一看下其内部源码:
Node源码:
static final class Node { // 模式,分为共享与独占 // 共享模式 static final Node SHARED = new Node(); // 独占模式 static final Node EXCLUSIVE = null; // 结点状态 // CANCELLED,值为1,表示当前的线程被取消 // SIGNAL,值为-1,表示当前节点的后继节点包含的线程需要运行,也就是unpark // CONDITION,值为-2,表示当前节点在等待condition,也就是在condition队列中 // PROPAGATE,值为-3,表示当前场景下后续的acquireShared能够得以执行 // 值为0,表示当前节点在sync队列中,等待着获取锁 static final int CANCELLED = 1; static final int SIGNAL = -1; static final int CONDITION = -2; static final int PROPAGATE = -3; // 结点状态 volatile int waitStatus; // 前驱结点 volatile Node prev; // 后继结点 volatile Node next; // 结点所对应的线程 volatile Thread thread; // 下一个等待者 Node nextWaiter; // 结点能否在共享模式下等待 final boolean isShared() { return nextWaiter == SHARED; } // 获取前驱结点,若前驱结点为空,抛出异常 final Node predecessor() throws NullPointerException { // 保存前驱结点 Node p = prev; if (p == null) // 前驱结点为空,抛出异常 throw new NullPointerException(); else // 前驱结点不为空,返回 return p; } // 无参构造函数 Node() { // Used to establish initial head or SHARED marker } // 构造函数 Node(Thread thread, Node mode) { // Used by addWaiter this.nextWaiter = mode; this.thread = thread; } // 构造函数 Node(Thread thread, int waitStatus) { // Used by Condition this.waitStatus = waitStatus; this.thread = thread; }}ConditionObject 源码
实现了condition接口,关于condition的学习请看下一小节:三、Condition条件等待与通知
// 内部类public class ConditionObject implements Condition, java.io.Serializable { // 版本号 private static final long serialVersionUID = 1173984872572414699L; /** First node of condition queue. */ // condition队列的头结点 private transient Node firstWaiter; /** Last node of condition queue. */ // condition队列的尾结点 private transient Node lastWaiter; /** * 构造函数 */ public ConditionObject() { } /** * 增加新的waiter到wait队列 */ private Node addConditionWaiter() { // 保存尾结点 Node t = lastWaiter; // 尾结点不为空,并且尾结点的状态不为CONDITION if (t != null && t.waitStatus != Node.CONDITION) { // 清理状态不为CONDITION的结点,对firstWaiter和lastWaiter重新赋值 unlinkCancelledWaiters(); // 将最后一个结点重新赋值给t t = lastWaiter; } // 新建一个结点 Node node = new Node(Thread.currentThread(), Node.CONDITION); // 尾结点为空 if (t == null) // 设置condition队列的头结点 firstWaiter = node; else // 设置为节点的nextWaiter域为node结点 t.nextWaiter = node; // 升级condition队列的尾结点 lastWaiter = node; return node; } /** * 转移first节点到sync队列 */ private void doSignal(Node first) { // 循环 do { // 将下一个节点设为首节点,假如为空 if ( (firstWaiter = first.nextWaiter) == null) // 设置尾结点为空 lastWaiter = null; // 设置first结点的nextWaiter域 first.nextWaiter = null; } while (!transferForSignal(first) && (first = firstWaiter) != null); // 将结点从condition队列转移到sync队列失败并且condition队列中的头结点不为空,一直循环 } /** * 转移所有等待队列的节点到同步队列 */ private void doSignalAll(Node first) { // condition队列的头结点尾结点都设置为空 lastWaiter = firstWaiter = null; // 循环 do { // 获取first结点的nextWaiter域结点 Node next = first.nextWaiter; // 设置first结点的nextWaiter域为空 first.nextWaiter = null; // 将first结点从condition队列转移到sync队列 transferForSignal(first); // 重新设置first first = next; } while (first != null); } /** * 过滤掉状态不为CONDITION的节点 * 对firstWaiter和lastWaiter重新赋值 **/ private void unlinkCancelledWaiters() { // 保存condition队列头结点 Node t = firstWaiter; Node trail = null; while (t != null) { // 下一个结点 Node next = t.nextWaiter; // t结点的状态不为CONDTION状态 if (t.waitStatus != Node.CONDITION) { // 设置t节点的额nextWaiter域为空 t.nextWaiter = null; if (trail == null) // trail为空 // 重新设置condition队列的头结点 firstWaiter = next; else // 设置trail结点的nextWaiter域为next结点 trail.nextWaiter = next; if (next == null) // next结点为空 // 设置condition队列的尾结点 lastWaiter = trail; } else // t结点的状态为CONDTION状态 // 设置trail结点 trail = t; // 设置t结点 t = next; } } /** * 实现Condition接口的signal方法 */ public final void signal() { if (!isHeldExclusively()) // 不被当前线程独占,抛出异常 throw new IllegalMonitorStateException(); // 保存condition队列头结点 Node first = firstWaiter; if (first != null) // 头结点不为空 // 唤醒一个等待线程 doSignal(first); } /** * 实现Condition的signalAll方法,唤醒所有线程 */ public final void signalAll() { if (!isHeldExclusively()) // 不被当前线程独占,抛出异常 throw new IllegalMonitorStateException(); // 保存condition队列头结点 Node first = firstWaiter; if (first != null) // 头结点不为空 // 唤醒所有等待线程 doSignalAll(first); } /** * 与await()区别在于,使用await方法,调用interrupt()中断后会报错,而该方法不会报错。 */ public final void awaitUninterruptibly() { // 增加一个结点到等待队列 Node node = addConditionWaiter(); // 获取释放的状态 int savedState = fullyRelease(node); boolean interrupted = false; while (!isOnSyncQueue(node)) { // // 阻塞当前线程 LockSupport.park(this); if (Thread.interrupted()) // 当前线程被中断 // 设置interrupted状态 interrupted = true; } if (acquireQueued(node, savedState) || interrupted) // selfInterrupt(); } /** * 等待,当前线程在接到信号或者被中断之前一直处于等待状态 */ public final void await() throws InterruptedException { // 当前线程被中断,抛出异常 if (Thread.interrupted()) throw new InterruptedException(); // 将当前线程包装成Node,尾插入到等待队列中 Node node = addConditionWaiter(); // 释放当前线程所占用的lock,在释放的过程中会唤醒同步队列中的下一个节点 int savedState = fullyRelease(node); int interruptMode = 0; while (!isOnSyncQueue(node)) { // 当前线程进入到等待状态 LockSupport.park(this); if ((interruptMode = checkInterruptWhileWaiting(node)) != 0) // 检查结点等待时的中断类型 break; } // 自旋等待获取到同步状态(即获取到lock) if (acquireQueued(node, savedState) && interruptMode != THROW_IE) interruptMode = REINTERRUPT; if (node.nextWaiter != null) // clean up if cancelled unlinkCancelledWaiters(); // 解决被中断的情况 if (interruptMode != 0) reportInterruptAfterWait(interruptMode); } /** * 等待,当前线程在接到信号、被中断或者到达指定等待时间之前一直处于等待状态 */ public final long awaitNanos(long nanosTimeout) throws InterruptedException { if (Thread.interrupted()) throw new InterruptedException(); Node node = addConditionWaiter(); int savedState = fullyRelease(node); final long deadline = System.nanoTime() + nanosTimeout; int interruptMode = 0; while (!isOnSyncQueue(node)) { if (nanosTimeout <= 0L) { transferAfterCancelledWait(node); break; } if (nanosTimeout >= spinForTimeoutThreshold) LockSupport.parkNanos(this, nanosTimeout); if ((interruptMode = checkInterruptWhileWaiting(node)) != 0) break; nanosTimeout = deadline - System.nanoTime(); } if (acquireQueued(node, savedState) && interruptMode != THROW_IE) interruptMode = REINTERRUPT; if (node.nextWaiter != null) unlinkCancelledWaiters(); if (interruptMode != 0) reportInterruptAfterWait(interruptMode); return deadline - System.nanoTime(); } /** * 等待,当前线程在接到信号、被中断或者到达指定最后期限之前一直处于等待状态 */ public final boolean awaitUntil(Date deadline) throws InterruptedException { long abstime = deadline.getTime(); if (Thread.interrupted()) throw new InterruptedException(); Node node = addConditionWaiter(); int savedState = fullyRelease(node); boolean timedout = false; int interruptMode = 0; while (!isOnSyncQueue(node)) { if (System.currentTimeMillis() > abstime) { timedout = transferAfterCancelledWait(node); break; } LockSupport.parkUntil(this, abstime); if ((interruptMode = checkInterruptWhileWaiting(node)) != 0) break; } if (acquireQueued(node, savedState) && interruptMode != THROW_IE) interruptMode = REINTERRUPT; if (node.nextWaiter != null) unlinkCancelledWaiters(); if (interruptMode != 0) reportInterruptAfterWait(interruptMode); return !timedout; } /** * 等待,当前线程在接到信号、被中断或者到达指定等待时间之前一直处于等待状态。此方法在行为上等 * 效于:awaitNanos(unit.toNanos(time)) > 0 */ public final boolean await(long time, TimeUnit unit) throws InterruptedException { long nanosTimeout = unit.toNanos(time); if (Thread.interrupted()) throw new InterruptedException(); // 1. 将当前线程包装成Node,尾插入到等待队列中 Node node = addConditionWaiter(); // 2. 释放当前线程所占用的lock,在释放的过程中会唤醒同步队列中的下一个节点 int savedState = fullyRelease(node); final long deadline = System.nanoTime() + nanosTimeout; boolean timedout = false; int interruptMode = 0; while (!isOnSyncQueue(node)) { if (nanosTimeout <= 0L) { timedout = transferAfterCancelledWait(node); break; } if (nanosTimeout >= spinForTimeoutThreshold) LockSupport.parkNanos(this, nanosTimeout); if ((interruptMode = checkInterruptWhileWaiting(node)) != 0) break; nanosTimeout = deadline - System.nanoTime(); } if (acquireQueued(node, savedState) && interruptMode != THROW_IE) interruptMode = REINTERRUPT; if (node.nextWaiter != null) unlinkCancelledWaiters(); if (interruptMode != 0) reportInterruptAfterWait(interruptMode); return !timedout; }大概理解源码后我们通过图看下同步队列和等待队列的关系:
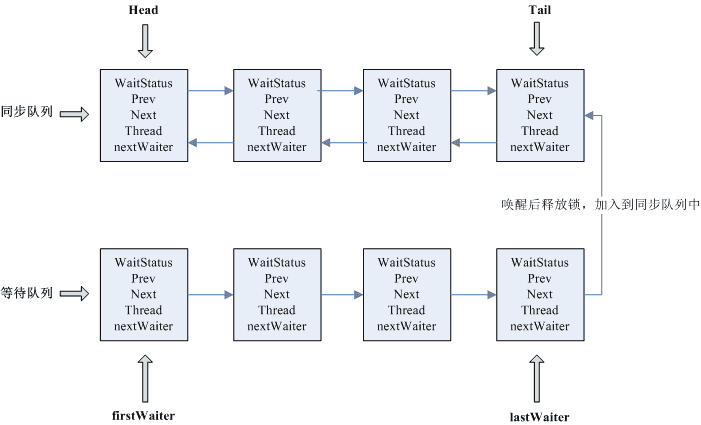 同步队列与等待队列模型
同步队列是一个双向的链表,每个节点会存储下一个节点的信息,是一种队列的实现。
等待队列是一个单向的链表,只有使用到Condition时才会存在,并且会存在多个。
当等待队列的线程被唤醒会被增加到同步队列的尾部。
二者的区别主要在于获取锁能否和排队顺序有关。当锁呗一个线程持有,其余尝试获取锁的线程会被挂起,加到等待队列中,先被挂起的在队列的最前台。当锁被释放,需要通知队列中的线程。作为公平锁,会先唤醒队列最前台的线程;而非公平锁会唤醒所有线程,通过竞争去获取锁,后来的线程有可能取得锁。
我们通过本节的开始时提供的例子,代码跟踪发现lock()默认走的是非公平锁:
public ReentrantLock() { //初始化默认是非公平锁 sync = new NonfairSync();}可以通过设置boolean的值设置是公平锁还是非公平锁
public ReentrantLock(boolean fair) { sync = fair ? new FairSync() : new NonfairSync();}lock()方法走NonFairLock的lock方法
public void lock() { sync.lock();}/** * 获取锁 */ final void lock() { //CAS尝试设置锁状态,占用锁 if (compareAndSetState(0, 1)) //修改状态成功,设置当前线程为独占锁拥有者 setExclusiveOwnerThread(Thread.currentThread()); else acquire(1); }只有一个线程的时候会直接独占,当存在线程竞争的时候CAS获取会返回false,走acquire(1);走到AQS的acquire方法。
public final void acquire(int arg) { //走非公平锁的获取锁方法 if (!tryAcquire(arg) && //锁获取失败并且增加该线程到等待队列中 acquireQueued(addWaiter(Node.EXCLUSIVE), arg)) //中断当前线程 selfInterrupt();}逐渐看看上面代码中的几个方法
tryAcquire()走到获取非公平锁:
final boolean nonfairTryAcquire(int acquires) { final Thread current = Thread.currentThread(); //获取当前状态 int c = getState(); if (c == 0) { // 活跃状态,再次尝试获取锁 if (compareAndSetState(0, acquires)) { setExclusiveOwnerThread(current); return true; } } //判断当前线程能否是占用锁的线程 else if (current == getExclusiveOwnerThread()) { //是当前持有锁的线程,计数加1 //TODO 这里我推测是可重入锁计数的实现,后面去验证 int nextc = c + acquires; if (nextc < 0) // overflow throw new Error("Maximum lock count exceeded"); setState(nextc); return true; } return false; }增加当前线程到同步队列
private Node addWaiter(Node mode) { Node node = new Node(Thread.currentThread(), mode); // 将尾节点设置为当前新节点的前继节点 Node pred = tail; if (pred != null) { node.prev = pred; //CAS设置当前节点为tail if (compareAndSetTail(pred, node)) { //将当前节点设置为上一节点的下一节点,有点绕 pred.next = node; return node; } } //尾节点是null enq(node); return node;}private Node enq(final Node node) { for (;;) { Node t = tail; if (t == null) { // Must initialize //尾节点是null,初始化头尾节点 if (compareAndSetHead(new Node())) tail = head; } else { //将node 设置为tail,设置前后节点的prev和next node.prev = t; if (compareAndSetTail(t, node)) { t.next = node; return t; } } }}acquireQueued():
final boolean acquireQueued(final Node node, int arg) { boolean failed = true; try { boolean interrupted = false; for (;;) { //获取当前节点的前置节点 final Node p = node.predecessor(); //假如前置节点是头并且能重新获取到锁,应该是防止入队列时头结点被释放 if (p == head && tryAcquire(arg)) { //设置当前节点为头 setHead(node); p.next = null; // help GC failed = false; //返回中断失败 return interrupted; } //假如前置节点不是head,也未获取到锁,立即执行中断 if (shouldParkAfterFailedAcquire(p, node) && parkAndCheckInterrupt()) interrupted = true; } } finally { if (failed) cancelAcquire(node); }}接下来分析unlock()方法:
public void unlock() { sync.release(1);}public final boolean release(int arg) { //尝试释放 if (tryRelease(arg)) { Node h = head; //head不是null,不是活跃状态 if (h != null && h.waitStatus != 0) //释放锁成功 unparkSuccessor(h); return true; } return false;}protected final boolean tryRelease(int releases) { //计数减1 int c = getState() - releases; //当前线程能否是持有锁的线程,不是则抛出异常 if (Thread.currentThread() != getExclusiveOwnerThread()) throw new IllegalMonitorStateException(); boolean free = false; if (c == 0) { free = true; //没有线程持有锁 setExclusiveOwnerThread(null); } setState(c); return free; }而公平锁获取比非公平锁多了一个判断
protected final boolean tryAcquire(int acquires) { final Thread current = Thread.currentThread(); int c = getState(); if (c == 0) { //此处添加了判断,能否有前驱节点在等待 if (!hasQueuedPredecessors() && compareAndSetState(0, acquires)) { setExclusiveOwnerThread(current); return true; } } else if (current == getExclusiveOwnerThread()) { int nextc = c + acquires; if (nextc < 0) throw new Error("Maximum lock count exceeded"); setState(nextc); return true; } return false; }//判断能否有前驱节点在等待public final boolean hasQueuedPredecessors() { Node t = tail; Node h = head; Node s; return h != t && ((s = h.next) == null || s.thread != Thread.currentThread());}java的Object类型实现线程等待与通知: 应用Object的wait(),wait(long timeout),wait(long timeout, int nanos)与notify(),notifyAll()。整体上看是通过对象监视器配合完成线程间的等待/通知机制。
Condition与Lock配合完成等待通知机制:针对Object类型的等待与通知,Condition也提供了对应的方式。
针对Object的wait(),wait(long timeout),wait(long timeout, int nanos),Condition提供了以下几个方法:
void await() throws InterruptedException:当前线程进入等待状态,假如其余线程调用condition的signal或者者signalAll方法并且当前线程获取Lock从await方法返回,假如在等待状态中被中断会抛出被中断异常;long awaitNanos(long nanosTimeout):当前线程进入等待状态直到被通知,中断或者者超时;boolean await(long time, TimeUnit unit)throws InterruptedException:当前线程进入等待状态直到被通知,支持自己设置时间单位boolean awaitUntil(Date deadline) throws InterruptedException:当前线程进入等待状态直到被通知,中断或者者到了某个指定时间还额外提供个
void awaitUninterruptibly(); 与await()区别在于,使用await方法,调用interrupt()中断后会报错,而该方法不会报错。针对Object的notify(),notifyAll(),Condition提供了以下几个方法:
void signal():唤醒一个等待在condition上的线程,将该线程从等待队列中转移到同步队列中,假如在同步队列中能够竞争到Lock则可以从等待方法中返回。void signalAll():够唤醒所有等待在condition上的线程,将一律线程从等待队列中转移到同步队列中,假如在同步队列中能够竞争到Lock则可以从等待方法中返回。以上锁的方式实际是在AQS中实现的,源码请看上一章节的AQS分析。
Condition与Object方式的不同:
Condition能够支持不响应中断,而通过使用Object方式不支持;Condition能够支持多个等待队列(new 多个Condition对象),而Object方式只能支持一个;Condition能够支持超时时间的设置,而Object不支持Condition结合ReentrantLock的使用:
/** * 库存 */static class Inventory { //初始化ReentrantLock实例 Lock lock = new ReentrantLock(); Condition condition = lock.newCondition(); //库存数量 private int num = 100; //添加库存 public void add(int n) throws InterruptedException { //加锁 lock.lock(); try { //先等待sub的通知 condition.await(); num += n; System.out.println("添加库存后的数量=" + num); } finally { //释放锁 lock.unlock(); } } //减少库存 public void sub(int n) throws InterruptedException { //加锁 lock.lock(); try { num -= n; System.out.println("减少库存后的数量=" + num); //睡1s,为了看add方法接收通知的效果 Thread.sleep(1000); condition.signal(); } finally { //释放锁 lock.unlock(); } }}结果分析:按照代码逻辑,先走添加方法,但是被await方法阻塞了,1s后执行sub方法,减少数量后并sleep1s,使用signal方法通知add方法,最终看到sub先输出,add后输出。
减少库存后的数量=99添加库存后的数量=100在代码中看到,condition对象实际是调用lock的new ConditionObject()方法,new了一个ConditionObject对象,ReentrantLock的内部Sync继承了AQS,而ConditionObject是AQS的一个内部类,实现了Condition接口。接口内提供了诸多通信机制的方法,可见ReentrantLock、AQS与Condition的紧密关联。相互关系请见本章节开头的图。
有点结论可以提出一下,理解过lock和synchronized之后,发现两种锁前者是基于jvm内存模型的,后者基于代码实现,不知道同学们有没有相同感受。
首先我们写个例子,来了解下门栓的含义:
public static void main(String[] args) throws InterruptedException { // 使用倒计数门闩器 ,迫使主线程进入等待 ;设置门栓的值为10 CountDownLatch latch = new CountDownLatch(10); new Thread(() -> { for (int i = 0; i < 10; i++) { //门栓值减1 latch.countDown(); System.out.println("当前门栓值:" + latch.getCount()); } }).start(); //阻塞主线程,等门栓值为0,主线程执行 latch.await(); System.out.println("主线程执行。。。");}结果:从以下结果可以看到,当门栓的值降到0之后,主线程执行了。
当前门栓值:9当前门栓值:8当前门栓值:7当前门栓值:6当前门栓值:5当前门栓值:4当前门栓值:3当前门栓值:2当前门栓值:1当前门栓值:0主线程执行。。。接下来我们分析下原理,其中有个内部类Sync,同样继承了AQS
 内部类
内部类private static final class Sync extends AbstractQueuedSynchronizer结合上面的例子逐渐分析源码,首先初始化了一个CountDownLatch对象:
// 使用倒计数门闩器 ,迫使主线程进入等待 ;设置门栓的值为10CountDownLatch latch = new CountDownLatch(10);//构造public CountDownLatch(int count) { if (count < 0) throw new IllegalArgumentException("count < 0"); this.sync = new Sync(count);}//同步代码块Sync(int count) { //设置AQS的state计数 setState(count);}用await阻塞主线程:
public void await() throws InterruptedException { //AQS的获取中断共享锁 sync.acquireSharedInterruptibly(1);}public final void acquireSharedInterruptibly(int arg) throws InterruptedException { if (Thread.interrupted()) throw new InterruptedException(); //获取当前值是多少 if (tryAcquireShared(arg) < 0) //获取共享锁 doAcquireSharedInterruptibly(arg);}protected int tryAcquireShared(int acquires) { return (getState() == 0) ? 1 : -1;}private void doAcquireSharedInterruptibly(int arg) throws InterruptedException { //填加获取共享锁类型到同步队列 final Node node = addWaiter(Node.SHARED); boolean failed = true; try { for (;;) { //获取前驱节点 final Node p = node.predecessor(); if (p == head) { //前驱节点等于head,尝试获取共享锁,就是获取state的值 int r = tryAcquireShared(arg); if (r >= 0) { //获取共享锁成功,设置当前节点为head,释放原head共享锁 setHeadAndPropagate(node, r); p.next = null; // help GC failed = false; return; } } //阻塞和中断 if (shouldParkAfterFailedAcquire(p, node) && parkAndCheckInterrupt()) throw new InterruptedException(); } } finally { if (failed) cancelAcquire(node); }}countDown()减数量,释放共享锁
public void countDown() { //释放共享锁 sync.releaseShared(1);}//AQS释放共享锁public final boolean releaseShared(int arg) { //获取state并减1 if (tryReleaseShared(arg)) { //无线循环并通过CAS释放所有共享锁 doReleaseShared(); return true; } return false;}先看一个使用例子
public static void main(String[] args) throws BrokenBarrierException, InterruptedException { CyclicBarrier cyclicBarrier = new CyclicBarrier(6); for (int i = 0; i < 5; i++) { new Thread(() -> { try { System.out.println(Thread.currentThread().getName() + "准备就绪"); cyclicBarrier.await(); System.out.println(Thread.currentThread().getName() + "到达"); } catch (InterruptedException e) { e.printStackTrace(); } catch (BrokenBarrierException e) { e.printStackTrace(); } }).start(); } Thread.sleep(1000); System.out.println(Thread.currentThread().getName() + "准备开始"); cyclicBarrier.await();}结果:5个线程和main函数进行await,当总数达到6后,开始执行。是不是很简单。
Thread-1准备就绪Thread-4准备就绪Thread-0准备就绪Thread-2准备就绪Thread-3准备就绪main准备开始Thread-1到达Thread-0到达Thread-3到达Thread-2到达Thread-4到达看看源码实现:
//构造函数,parties为线程数量public CyclicBarrier(int parties) { this(parties, null);}//Runnable 参数,这个参数的意思是最后一个到达线程要做的任务public CyclicBarrier(int parties, Runnable barrierAction) { if (parties <= 0) throw new IllegalArgumentException(); this.parties = parties; this.count = parties; this.barrierCommand = barrierAction;}//阻塞方法public int await() throws InterruptedException, BrokenBarrierException { try { //引入了Condition等待队列,使用await()方法与signalAll()方法,通过counnt计数 return dowait(false, 0L); } catch (TimeoutException toe) { throw new Error(toe); // cannot happen }}Semaphore 通常我们叫它信号量, 可以用来控制同时访问特定资源的线程数量,通过协调各个线程,以保证正当的使用资源。
官方解释是Semaphore用于限制可以访问某些资源(物理或者逻辑的)的线程数目,他维护了一个许可证集合,有多少资源需要限制就维护多少许可证集合,如果这里有N个资源,那就对应于N个许可证,同一时刻也只能有N个线程访问。一个线程获取许可证就调用acquire方法,用完了释放资源就调用release方法。
举个例子:
public static void main(String[] args) { Semaphore semaphore = new Semaphore(2); for (int i = 0; i < 10; i++) { new Thread(() -> { try { semaphore.acquire(); System.out.println("线程" + Thread.currentThread().getName() + "占用时间:" + LocalDateTime.now()); Thread.sleep(2000); semaphore.release(); } catch (InterruptedException e) { e.printStackTrace(); } }).start(); }}结果:每次只通过两个线程,等待两秒。
线程Thread-0占用时间:2020-08-24T09:45:31.738线程Thread-1占用时间:2020-08-24T09:45:31.738线程Thread-2占用时间:2020-08-24T09:45:33.740线程Thread-3占用时间:2020-08-24T09:45:33.740线程Thread-4占用时间:2020-08-24T09:45:35.740线程Thread-5占用时间:2020-08-24T09:45:35.740线程Thread-6占用时间:2020-08-24T09:45:37.741线程Thread-7占用时间:2020-08-24T09:45:37.741线程Thread-8占用时间:2020-08-24T09:45:39.741线程Thread-9占用时间:2020-08-24T09:45:39.742针对上面的例子,我们看下具体的实现原理:
 内部类
内部类实现了三个内部类,与ReentrantLock是相同的,Syn继承的AQS,公平锁与非公平锁分别继承Sync实现同步。
初始化方法:默认非公平锁,同时定义下通行证的数量。将通行证数量设置到AQS的state。
public Semaphore(int permits) { sync = new NonfairSync(permits);}protected final void setState(int newState) { state = newState;}获取锁方法:semaphore.acquire();
public void acquire() throws InterruptedException { //获取共享可中断锁 sync.acquireSharedInterruptibly(1);}public final void acquireSharedInterruptibly(int arg) throws InterruptedException { if (Thread.interrupted()) throw new InterruptedException(); //尝试获取共享锁,小于0,则表示当前通行证不足 if (tryAcquireShared(arg) < 0) //通行证数量不足,创立阻塞队列 doAcquireSharedInterruptibly(arg);}跟踪tryAcquireShared(arg)究竟层:
final int nonfairTryAcquireShared(int acquires) { for (;;) { //获取通行证数量 int available = getState(); //减去需要或者获得数量 int remaining = available - acquires; //获取后数量小于0,直接返回获取后数量,大于0,CAS设置state if (remaining < 0 || compareAndSetState(available, remaining)) return remaining; } }跟踪doAcquireSharedInterruptibly(int arg)方法
private void doAcquireSharedInterruptibly(int arg) throws InterruptedException { //增加共享锁节点到同步队列的尾部 final Node node = addWaiter(Node.SHARED); boolean failed = true; try { for (;;) { //取得当前节点pre节点 final Node p = node.predecessor(); if (p == head) { //再次尝试获取共享锁 int r = tryAcquireShared(arg); if (r >= 0) { //获取共享锁成功,设置当前节点为head,释放原head共享锁 setHeadAndPropagate(node, r); p.next = null; // help GC failed = false; return; } } //重组双向链表,清空无效节点,挂起当前线程 if (shouldParkAfterFailedAcquire(p, node) && parkAndCheckInterrupt()) throw new InterruptedException(); } } finally { if (failed) cancelAcquire(node); }}释放锁方法semaphore.release(),跟踪究竟层
public final boolean releaseShared(int arg) { //释放锁 if (tryReleaseShared(arg)) { doReleaseShared(); return true; } return false;}protected final boolean tryReleaseShared(int releases) { for (;;) { //获取当前状态 int current = getState(); //加上要释放的值得到最新的值 int next = current + releases; //加完后小于当前值,【】抛出异常 if (next < current) // overflow throw new Error("Maximum permit count exceeded"); //CAS设置state if (compareAndSetState(current, next)) return true; } }private void doReleaseShared() { for (;;) { Node h = head; if (h != null && h != tail) { int ws = h.waitStatus; //能否需要唤醒后继节点 if (ws == Node.SIGNAL) { if (!compareAndSetWaitStatus(h, Node.SIGNAL, 0)) continue; // loop to recheck cases //唤醒h.nex节点线程 unparkSuccessor(h); } else if (ws == 0 && !compareAndSetWaitStatus(h, 0, Node.PROPAGATE)) continue; // loop on failed CAS } if (h == head) // loop if head changed break; }}最主要的区别在于,Semaphore可以进行死锁恢复。
我们看下Lock的释放锁源码,以ReentrantLock为例。假如当前线程不是持有锁的线程,则抛出IllegalMonitorStateException异常,也就是说,Lock在unlock前,必需先lock,持有锁。
protected final boolean tryRelease(int releases) { //计数减1 int c = getState() - releases; //当前线程能否是持有锁的线程,不是则抛出异常 if (Thread.currentThread() != getExclusiveOwnerThread()) throw new IllegalMonitorStateException(); boolean free = false; if (c == 0) { free = true; //没有线程持有锁 setExclusiveOwnerThread(null); } setState(c); return free;}而Semaphore则没有这个判断,会直接将设置state的值,添加通行证的数量。分别举两个例子看下。
public static void main(String[] args) { Lock lock = new ReentrantLock(); //Semaphore semaphore = new Semaphore(1); new Thread(()->{ lock.unlock(); }).start();}结果抛出异常:
Exception in thread "Thread-0" java.lang.IllegalMonitorStateExceptionat java.util.concurrent.locks.ReentrantLock$Sync.tryRelease(ReentrantLock.java:151)at java.util.concurrent.locks.AbstractQueuedSynchronizer.release(AbstractQueuedSynchronizer.java:1261)at java.util.concurrent.locks.ReentrantLock.unlock(ReentrantLock.java:457)at com.cloud.bssp.thread.SemaphoreAndLock.lambda$main$0(SemaphoreAndLock.java:26)at java.lang.Thread.run(Thread.java:748)下面来看下semaphore的例子
public static void main(String[] args) throws InterruptedException { Semaphore semaphore = new Semaphore(1); System.out.println("当前通行证数量:" + semaphore.availablePermits()); new Thread(()->{ semaphore.release(); }).start(); Thread.sleep(1000); System.out.println("当前通行证数量:" + semaphore.availablePermits());}结果:发现在release之后,数量添加的一个。我们可以利用这个特性去做死锁恢复。
简单模仿下死锁恢复的例子,两个线程一个先占用semaphore1,一个先占用semaphore2,分别sleep5秒,这时候没有释放,在去占用另外一个,发现产生了死锁,线程卡在这里不动了。main方法主线程会在10秒后去判断能否释放锁,没有的话由主线程去释放,这时候发现两个线程分别获取到了锁。
/** * 死锁恢复 */public static void main(String[] args) throws InterruptedException { Semaphore semaphore1 = new Semaphore(1); Semaphore semaphore2 = new Semaphore(1); new Thread(() -> { try { semaphore1.acquire(); System.out.println("线程" + Thread.currentThread().getName() + "获取semaphore1"); Thread.sleep(5000); semaphore2.acquire(); System.out.println("线程" + Thread.currentThread().getName() + "获取semaphore2"); } catch (InterruptedException e) { e.printStackTrace(); } }).start(); new Thread(() -> { try { semaphore2.acquire(); System.out.println("线程" + Thread.currentThread().getName() + "获取semaphore2"); Thread.sleep(5000); semaphore1.acquire(); System.out.println("线程" + Thread.currentThread().getName() + "获取semaphore1"); } catch (InterruptedException e) { e.printStackTrace(); } }).start(); Thread.sleep(10000); //主线程等待十秒,判断两个线程能否执行完毕,能否释放锁 if (semaphore1.availablePermits() != 1) { System.out.println("发生死锁了,释放semaphore1"); semaphore1.release(); } if (semaphore2.availablePermits() != 1) { System.out.println("发生死锁了,释放semaphore2"); semaphore2.release(); }}结果:
线程Thread-0获取semaphore1线程Thread-1获取semaphore2发生死锁了,释放semaphore1发生死锁了,释放semaphore2线程Thread-1获取semaphore1线程Thread-0获取semaphore2顾名思义,ThreadLocal可以了解为线程本地变量,当创立了ThreadLocal变量,那么线程对于ThreadLocal的读取就是相互隔离的,不会产生影响。
先抛个实际使用的例子扔在这,10个线程分别对ThreadLocal进行加1,最终结果都是101,每个线程修改了各自的本地变量。假如是int类型的,结果应该为110,表现了线程本地变量的特性。
/** * 库存 */static class Inventory { private ThreadLocal<Integer> num = ThreadLocal.withInitial(() -> 100); //添加库存 public synchronized void add(int n, String threadName) { //添加库存 num.set(num.get() + n); System.out.println("线程:" + threadName + ",添加库存后的数量=" + num.get()); }}public static void main(String[] args) { Inventory inventory = new Inventory(); for (int i = 0; i < 10; i++) { new Thread(() -> { inventory.add(1, Thread.currentThread().getName()); }).start(); }}结果:
线程:Thread-0,添加库存后的数量=101线程:Thread-2,添加库存后的数量=101线程:Thread-1,添加库存后的数量=101线程:Thread-3,添加库存后的数量=101线程:Thread-7,添加库存后的数量=101线程:Thread-9,添加库存后的数量=101线程:Thread-8,添加库存后的数量=101线程:Thread-6,添加库存后的数量=101线程:Thread-4,添加库存后的数量=101线程:Thread-5,添加库存后的数量=101我很难写出比这篇文章更好的了,所以直接上连接了,不在写了,这篇文章绝对是当前百度能找到最详细的了。
https://www.cnblogs.com/micrari/p/6790229.html
在jdk1.7中被引入,能够完成多阶段的任务,并且每个阶段可以多线程并发执行,但是需要当前阶段一律完成才能进入下一阶段,相比于CyclicBarrier或者者CountryDownLatch,功能更增强大和灵活。
/** * 线程数,即学生数量 */private static int PARTIES = 5;static Phaser p = new Phaser() { @Override protected boolean onAdvance(int phase, int registeredParties) { switch (phase) { case 0: System.out.println("第一题完成"); return false; case 1: System.out.println("第二题完成"); return false; case 2: System.out.println("第三题完成"); return false; default: return true; } }};private static void firstQuestion() { System.out.println("线程:" + Thread.currentThread().getName() + ",第一题"); p.arriveAndAwaitAdvance();}private static void secondQuestion() { System.out.println("线程:" + Thread.currentThread().getName() + ",第二题"); p.arriveAndAwaitAdvance();}private static void thirdQuestion() { System.out.println("线程:" + Thread.currentThread().getName() + ",第三题"); p.arriveAndAwaitAdvance();}public static void main(String[] args) { for (int i = 0; i < PARTIES; i++) { new Thread(() -> { //线程注册 p.register(); firstQuestion(); secondQuestion(); thirdQuestion(); }).start(); }}结果:五个线程分阶段完成了每个题目
线程:Thread-1,第一题线程:Thread-3,第一题线程:Thread-2,第一题线程:Thread-0,第一题线程:Thread-4,第一题第一题完成线程:Thread-4,第二题线程:Thread-3,第二题线程:Thread-2,第二题线程:Thread-1,第二题线程:Thread-0,第二题第二题完成线程:Thread-0,第三题线程:Thread-4,第三题线程:Thread-1,第三题线程:Thread-3,第三题线程:Thread-2,第三题第三题完成Exchanger 是 JDK 1.5 开始提供的一个用于两个工作线程之间交换数据的封装工具类,当第一个线程调用了exchange()方法后,当前线程会进入阻塞状态,直到第二个线程也执行了exchange()方法,交换数据,继续执行。
/** * 初始化string类型的Exchanger */static Exchanger<String> exchanger = new Exchanger<>();public static void main(String[] args) throws InterruptedException { new Thread(() -> { String flag1 = "111"; System.out.println(Thread.currentThread().getName() + "交换前flag1=" + flag1); try { //交换数据,并进入阻塞 flag1 = exchanger.exchange(flag1); } catch (InterruptedException e) { e.printStackTrace(); } System.out.println(Thread.currentThread().getName() + "交换后flag1=" + flag1); }).start(); Thread.sleep(1000); new Thread(() -> { String flag2 = "222"; System.out.println(Thread.currentThread().getName()+ "交换后flag2=" + flag2); try { //交换数据,唤醒上一个线程 flag2 = exchanger.exchange(flag2); } catch (InterruptedException e) { e.printStackTrace(); } System.out.println(Thread.currentThread().getName()+ "交换前flag2=" + flag2); }).start();}结果:在交换过后,flag1和flag2的值发生了互换。
Thread-0交换前flag1=111Thread-1交换后flag2=222Thread-1交换前flag2=111Thread-0交换后flag1=222

送码官方微信


![[SLG/PC+安卓] 龙之女 Daughters of the Dragon v0.194[470MB]](https://img.songma.com/upload/156100/1746426367-156100/0525576001746426398tp156100-1.jpg)


 属性代理商Property Delegates")


 手机访问领取大礼包