分类
商品


![[ JS系列5 ] 可选的分号](https://pic.songma.com/wenzhang/20180606/cvzrdb3n0vf4157.jpg "[ JS系列5 ] 可选的分号")


- 商品
- 店铺
- 资讯
之前在《如何说服你的同事使用TDD》中详情了为什么要使用TDD(测试驱动开发),以及如何使用TDD写代码。文章发表后,有同学在评论区中表示文章写得不错,但是举得例子太过脱离实际了,能不能举一个在实际工作中的例子呀。这篇文章,就来分享一下在Spring Boot中,如何使用TDD写出功能健壮、代码整洁的高质量接口。
我将用一个简单的案例,向你展现:
我们要实现的接口,功能非常简单,就是能够对敏感字眼进行检查的发帖功能,不允许发带有“shit”、“fxxk”之类字眼的帖子,嗯,我们是一个文明的社区!
接口文档如下:
接口说明
发布帖子,同时对敏感字眼进行校验
URL
/v2.0/posts
HTTP请求方式
POST
请求体
参数: content(帖子的内容,String)
响应
200 创立成功,返回成功创立的帖子信息
400 创立失败,帖子中包含敏感字眼
示例1
请求体
{ "content": "hello world!"}响应
200
{ "id": 1, "content": "hello world!", "username": "sexy code", "createDate": 1515312619351}示例2
请求体
{ "content": "hello shit!"}响应
{ "errorCode": 100001, "errorInfo": "post contains sensitive info"}假如不采用TDD,那么下一步就是拿着接口文档开发接口了,但是这很不TDD。TDD要求我们先写测试用例。
你或者许会认为不写测试用例,同样可以写出实现功能的接口。别急,测试用例带给你的好处远远不止正确性。
看完上面那份接口文档,我们很自然的想到有下面两个测试用例:
上面这两个测试用例,都是从模拟用户端请求,到后端业务层和数据库层操作,再到返回响应的端到端测试,因而属于集成测试。
集成测试要求我们启动Spring Boot的容器,因而运行起来会比较慢。通常情况下,集成测试只覆盖基本场景,更细致的测试,可以交给单元测试。
比方在这个场景中,我们可以针对判断内容中能否含有敏感信息的这个功能,进行单元测试,这也就要求我们把这个功能,抽取成一个方法,这样才方便我们写测试用例。因为单元测试不需要启用Spring Boot容器,因而测试用例运行起来将非常迅速。
TDD在不知不觉中提高了我们的代码质量。它让我们从测试用例的角度出发,思考如何写出方便测试的代码,方便测试的代码,往往是符合单一职责的。
制定好测试策略之后,下面开始写第一个测试用例。
一个测试用例通常包括以下三个步骤:
对于我们这个发帖的接口,那就是:
使用Spring Boot提供的测试框架,可以很轻松的将上面这个过程写成代码(本文的所有代码,可到Github下载,欢迎加星):
@RunWith(SpringRunner.class)@SpringBootTest@AutoConfigureMockMvcpublic class PostControllerV2ITTest { public static final String POST_CONTENT_VALID = "post content test"; public static final String POST_URL = "/v2.0/posts"; @Autowired private MockMvc mockMvc; @Autowired private ObjectMapper objectMapper; @Autowired private PostRepository postRepository; @Test public void testCreatePost_returnSuccess() throws Exception { ResultActions resultActions = sendCreatePostRequest(POST_CONTENT_VALID); checkCreateValidPostResult(resultActions, POST_CONTENT_VALID); } ...}PostControllerV2ITTest类上的几个注解,@RunWith、@SpringBootTest等,是Spring Boot提供的用于创立集成测试环境的注解,本文重点在于TDD,因而这几个注解的具体用途和原理就不逐个赘述了,有兴趣的同学可以查看Spring Boot官方文档中关于测试框架的详情。
代码中发送请求的函数sendCreatePostRequest和检查请求结果的函数checkCreateValidPostResult分别如下:
sendCreatePostRequest:
private ResultActions sendCreatePostRequest(String postContent) throws Exception { PostCreateDTO postCreateDTO = new PostCreateDTO(postContent); return mockMvc.perform(post(POST_URL) .contentType(MediaType.APPLICATION_JSON) .content(objectMapper.writeValueAsString(postCreateDTO))); }checkCreateValidPostResult:
private void checkCreateValidPostResult(ResultActions resultActions, String expectedContent) throws Exception { resultActions.andExpect(status().isCreated()); Post postFromRsp = transferResponse2PostEntity(resultActions); Post postFromDB = postRepository.findOne(postFromRsp.getId()); assertNotNull(postFromDB); assertEquals(expectedContent, postFromDB.getContent()); } private Post transferResponse2PostEntity(ResultActions resultActions) throws java.io.IOException { String response = resultActions.andReturn().getResponse().getContentAsString(); return objectMapper.readValue(response, Post.class); }写完测试用例,编辑器会用飘红提示你,你还没创立PostRepository、Post、PostCreateDTO这些类。嗯,别急,这就创立。
PostRepository,使用Spring Data,可以轻松写出一个自带增删改查功能的DAO:
public interface PostRepository extends CrudRepository<Post, Long> {}Post,其实就是数据库中的存储结构,用Java Entity的形式表示出来:
@Entitypublic class Post { @Id @GeneratedValue(strategy = GenerationType.AUTO) private long id; private String content; private String username; private Date createDate; public long getId() { return id; } public void setId(long id) { this.id = id; } public String getContent() { return content; } public void setContent(String content) { this.content = content; } public String getUsername() { return username; } public void setUsername(String username) { this.username = username; } public Date getCreateDate() { return createDate; } public void setCreateDate(Date createDate) { this.createDate = createDate; }}PostCreateDTO,发帖接口的请求体:
public class PostCreateDTO { private String content; public String getContent() { return content; } public void setContent(String content) { this.content = content; } public PostCreateDTO(String content) { this.content = content; } public PostCreateDTO() { }}创立完这三个类之后,测试用例可以编译通过了,执行它,因为我们还没有写接口,嗯,测试用例天经地义、预料之中地失败了:

@RestController@RequestMapping("/v2.0/posts")public class PostControllerV2 { @Autowired private PostService postService; @RequestMapping(value="", method= RequestMethod.POST) public ResponseEntity createPost(@RequestBody PostCreateDTO postCreateDTO) { return postService.createPost(postCreateDTO); }}PostService,业务层操作,将PostCreateDTO转成Post,而后调用postRepository,将数据保存到数据库中:
@Servicepublic class PostService { @Autowired private PostRepository postRepository; @Autowired private UserService userService; public ResponseEntity createPost(PostCreateDTO postCreateDTO) { Post postCreateResult = savePost2DB(postCreateDTO); return ResponseEntity.status(HttpStatus.CREATED).body(postCreateResult); } private Post savePost2DB(PostCreateDTO postCreateDTO) { Post post = new Post(); post.setCreateDate(new Date()); post.setContent(postCreateDTO.getContent()); post.setUsername(userService.queryCurrentUserName()); return postRepository.save(post); }}PostService中用到了另一个Service,UserService,用于获取当前登录客户,当然这里并没有真的去从session中获取客户信息:
@Servicepublic class UserService { public String queryCurrentUserName() { return "sexy code"; }}完工,运行下测试用例,通过后,我们继续写下一个集成测试用例——敏感字段校验。
第二个用例仍然遵循测试用例“三部曲”,创立环境->创立带有敏感信息的帖子->检查响应是不是400、检查数据库中是不是没有数据。这里只贴上新添加的代码。
PostControllerV2ITTest:
public static final String POST_CONTENT_SENSITIVE = "post content test fuck"; ... @Test public void testCreatePost_withSensitiveInfo_returnBadRequest() throws Exception { ResultActions resultActions = sendCreatePostRequest(POST_CONTENT_SENSITIVE); checkCreateSensitivePostResult(resultActions); } ... private void checkCreateSensitivePostResult(ResultActions resultActions) throws Exception { resultActions.andExpect(status().isBadRequest()); long count = postRepository.count(); assertEquals(0, count); }运行新的测试用例,自然又是天经地义的失败。继续写产品代码。因为我们遵循良好的分层结构,Controller不需要做任何修改,只要给PostService加上判断敏感字段的逻辑就可,PostService:
... public ResponseEntity createPost(PostCreateDTO postCreateDTO) { if(isPostContainsSensitiveInfo(postCreateDTO.getContent())) { return ResponseEntity.status(HttpStatus.BAD_REQUEST).body(new ErrorInfo(SENSITIVE_INFO_ERROR_CODE, POST_CONTAINS_SENSITIVE_INFO)); } Post postCreateResult = savePost2DB(postCreateDTO); return ResponseEntity.status(HttpStatus.CREATED).body(postCreateResult); } private boolean isPostContainsSensitiveInfo(String content) { // TODO: change to throw exception and use global exception handler to return response if(content.contains("shit") || content.contains("fuck")) { return true; } return false; }...这里的isPostContainsSensitiveInfo就是我们用来判断敏感字段的方法,我们将整个判断逻辑抽取出来,方便后面的单元测试。
值得注意的是,这个方法更好的做法是在判断为含有敏感信息时,抛出异常,而不是返回true这种标志(参见《Effective Java》第九章异常中提出的准则),不过因为我还没给整个Spring Boot项目加上全局异常解决器,因而这里暂时先使用返回boolean的方式来解决,后面会写一篇文章来分享如何在Spring Boot中把异常转换为http状态码。
写完产品代码,再来运行测试用例,通过。
现在我们的代码已经可以满足上面两个集成测试,可以说基础场景的功能我们已经实现了。但是我们的测试覆盖率并不全。
举个简单的例子,"shit"和"fxxk"都是敏感信息,但是上面我们只测试了"fxxk"的场景,可是专门给"shit"这个场景写一个集成测试又未免太过兴师动众,这时候我们即可以使用单元测试,来对功能进行更细致并且更快速的测试。因为isPostContainsSensitiveInfo是private方法,因而我们在测试时用到了反射。
PostServiceUnitTest:
public class PostServiceUnitTest { @Test public void testMethod_IsPostContainsSensitiveInfo() throws NoSuchMethodException, InvocationTargetException, IllegalAccessException { Class<PostService> postServiceClass = PostService.class; Method method = postServiceClass.getDeclaredMethod("isPostContainsSensitiveInfo", String.class); method.setAccessible(true); PostService postService = new PostService(); checkWithContent(method, postService, "hi and fuck", true); checkWithContent(method, postService, "hello world", false); checkWithContent(method, postService, "hello shit", true); } private void checkWithContent(Method method, PostService postService, String content, boolean expected) throws IllegalAccessException, InvocationTargetException { boolean isSensitive = (Boolean)method.invoke(postService, content); assertEquals(expected, isSensitive); }}显然,这是一个非常简单的Junit,不需要启用Spring Boot容器,运行起来自然也是相当迅速,在我的机器上,执行一次集成测试要花费15秒,其中绝大多数时间都是花在初始化容器上,而执行一个单元测试只要要1秒。
写测试用例有一个准则,那就是各个用例之间不能够相互影响,而我在testCreatePost_returnSuccess用例中给数据库插入了数据,却没有在testCreatePost_withSensitiveInfo_returnBadRequest用例开始之前对数据库进行清空,这样testCreatePost_returnSuccess用例中插入的数据就会带到下一个用例中去,更不幸的是,我们在testCreatePost_withSensitiveInfo_returnBadRequest用例中还加入了如下数据库count的校验:
... long count = postRepository.count(); assertEquals(0, count); ...因而,只需testCreatePost_returnSucces用例在testCreatePost_withSensitiveInfo_returnBadRequest之前执行,那么testCreatePost_withSensitiveInfo_returnBadRequest就会失败。
我们来验证一下,为了实现上面所讲的测试用例的执行顺序,我给PostControllerV2ITTest加入了@FixMethodOrder(MethodSorters.NAME_ASCENDING)注解:
@FixMethodOrder(MethodSorters.NAME_ASCENDING)public class PostControllerV2ITTest执行测试用例,果然,testCreatePost_withSensitiveInfo_returnBadRequest失败了:
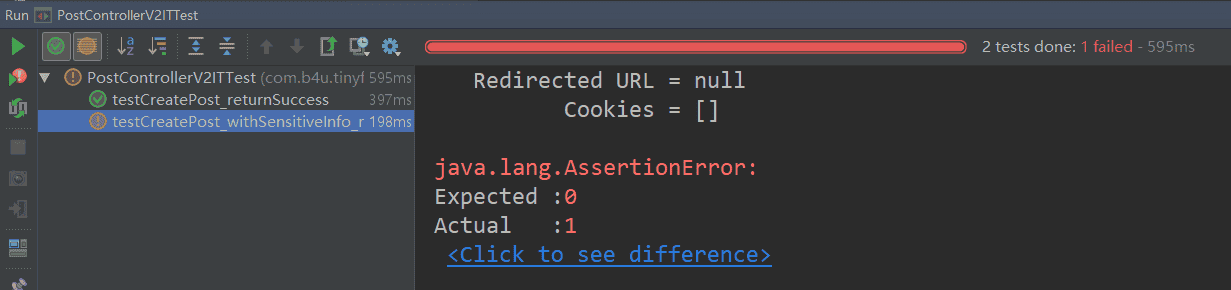
预期0,结果1,由于我们在用例开始前没有清空数据库,导致用例之间相互影响。要处理这个问题,很简单,只要要写个@Before注解的函数,并在函数中清空表中的数据:
@Before public void setup() { postRepository.deleteAll(); }@Before是Junit提供的注解,每个测试用例在执行前,都会执行被@Before注解的函数。
这篇文章只是举了一个我认为的,足够简单,却又足够说明问题的例子,在实际开发中,自然会遇到更多的场景,比方:
Spring Boot为我们写好测试用例、用好TDD提供了非常方便的框架,我们只要尽情去写测试用例,尽情去TDD就好了。
这篇文章尽管是在谈如何在Spring Boot中使用TDD写高质量的接口,但是从这样一个例子中,我们也看到了TDD的很多好处:
让你开发时充满成就感:你写代码就是为了让本来fail的测试用例通过,这让你写代码时更加具备目标,同时也让你的代码好坏具备可以量化的指标。
促进整洁的代码:正如之前提到的,TDD让我们从测试用例的角度出发,思考如何写出方便测试的代码,方便测试的代码,往往是符合单一职责的。
提高开发的效率:我身边很多不写测试用例的同事,每次一修改代码,就把代码编译成class文件放到环境上,而后重启、测试,这对于小项目来说尚可接受,但是对于一个大的项目,重启往往需要花费很多时间,而且在我接触到的一个Docker容器化的项目中,还不支持用单个class文件替换的方式去打补丁,每次替换都需要替换整个服务的代码,嗯,而后每次替换、验证、发现新Bug,再修改、替换、验证... 这样开发的效率自然不高。但是假如你已经在本地环境上写了充分的测试用例,那么代码一把布上去,一把验证通过,也就是家常便饭了的事了。
提高了测试用例的代码覆盖率:这几乎无需解释,先写测试用例,再写产品代码,和先写产品代码,后来因为某种政治任务的压迫,再来补测试用例,前者写出来的测试用例质量肯定更高,测试的覆盖率也肯定更大。而代码覆盖率的提高,将带给我们下面两个个超级好处:
写完这篇文章,结合之前那篇《如何说服你的同事使用TDD》,嗯,这下我真的非常有信心,可以说服你们使用TDD,说服你们去说服你们同事,使用TDD了。


送码官方微信


![[SLG/PC+安卓] 龙之女 Daughters of the Dragon v0.194[470MB]](https://img.songma.com/upload/156100/1746426367-156100/0525576001746426398tp156100-1.jpg)


 属性代理商Property Delegates")


 手机访问领取大礼包